
Entering & managing the schedule
Your competition schedule should be entered into the system once you receive it from your chief referee. Every item in your schedule can be entered into the website. This includes "custom" items such as "Opening Ceremony", breaks for ice resurfacing (also called "ice makes"), as well as events, practice-ice sessions, and scheduled warmup sessions.
Schedule items can be uploaded in bulk or entered one-at-a-time by hand (see below for detailed instructions). Your schedule is viewable only by you (administrator) until you officially publish it. Once your schedule is published, your skaters and their coaches can see it, as well as any other interested party, such as skaters' relatives. After the schedule is published, a link to it will appear on your competition home page; no special permissions are necessary to gain access to it.
The importance of publishing a scheduleThe publishing of your schedule is one of the most important benefits of the EntryEeze system:
- Personalized schedules for your skaters -- Your skaters can visit their "My Schedule" screen to see the items in the schedule pertaining only to them, in chronological order. Each event in this display will be clickable, so they can see the other skaters competing in the same event. This screen also contains a print button, so the skater can print his or her personal schedule on paper.
- Personalized schedules for your coaches -- All coaches who have skaters participating in your competition will have their own "My Schedule" screen. It will show every event and practice-ice session involving their skaters, along with the names of those skater(s).
- Online practice-ice selection -- Your skaters can select their own practice-ice sessions. See the online practice-ice selection guide for more details.
- Online practice-ice sales -- Your skaters can purchase practice-ice sessions online with a credit-card, reducing the lines at your practice-ice desk during the competition. Click here for more instruction on using this feature.
- Instant broadcast -- You no longer have to mail schedules to participants. The system automatically sends emails to all coaches and skaters when you publish your schedule, letting them know that the schedule is available for viewing. Participants access it at their convenience.
Entering the schedule into the system may be one of the more time-consuming aspects of your competition. If your competition is large, it could take you a few hours to complete the work.
To streamline the process, we provide a number of tools to make the job easier. In the sections that follow, we'll walk you through the process of populating the EntryEeze system with your schedule and fine-tuning it in preparation for official publishing.
The first step is to enter the "Schedule Management" screen, under the "Schedule" menu on your Administration home-page. On this screen, you'll see a panel resembling the following:
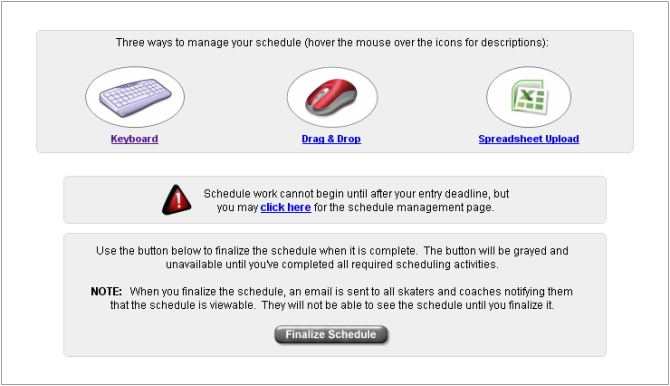
This is the central screen where you'll manage your schedule -- watch the text area below the three "options" for alerts on missing or incomplete items. Generally, the "keyboard" or "drag-n-drop" screen can be used to make modifications to your schedule as you work on it; the "spreadsheet upload" option is intended for first-time population of your schedule.
Each scheduling "option" (keyboard, drag-n-drop, spreadsheet upload) contains on-screen help and instructions to assist you in navigation. Look for small blue "question mark" icons that you can click or mouse-hover for more information.
Generally, the drag-n-drop screen is the easiest to use because of its interactive capabilities; however, the spreadsheet-upload is perhaps the most effective if you are very accustomed to working with spreadsheet applications such as Microsoft Excel. Please see the following section for information....
This method of entering your schedule is no longer recommended. Most of our clients use the drag-n-drop screen to input the schedule.
The easiest way to put your schedule into the system is by spreadsheet upload. The system accepts schedule information from a CSV file in a particular format. The file is analyzed and any errors are reported to you, and then you have the option of committing or aborting the upload.
To get started, click the "Spreadsheet Upload" icon from the Schedule Management screen:
The "Get template" buttons will create the outline of your upload file for you, based on the events in your configuration. You'll need to put start- and end-times, group names, and designators (i.e., "Mixed", "Girls", etc) into the appropriate fields.
The template will have suggested group-names filled in for you. Any event that has more than 12 entered skaters will be divided into groups based on a maximum of 12 skaters per group, and the groups will be named A, B, C, and so on. You can, of course, name the groups as you wish, and add or remove groups as needed.
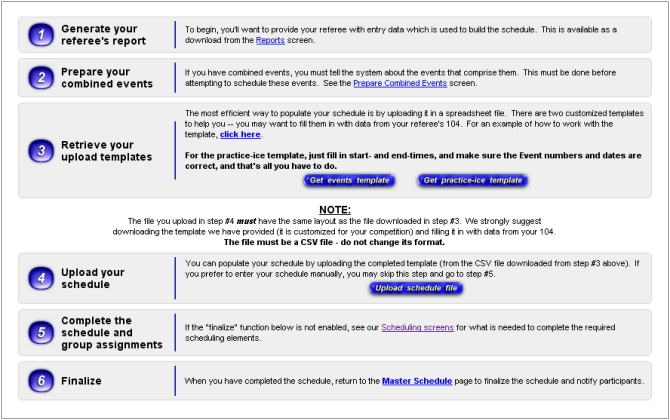
If you have a Referee's 104 spreadsheet, it should be possible to populate most of your schedule in the EntryEeze system from it. Some re-formatting will be necessary; this section describes the steps needed to convert your "104" file to an EntryEeze-consumable upload file.
Step 1 -- Understanding the upload file formatEach schedule item is one line in the CSV text file (one row in your spreadsheet program). Each row has 11 fields:
| Field # | Name | Description |
|---|---|---|
| 1 | Event Number | Required for event groups and practice-ice sessions. This can be left blank for custom events. It must be a positive whole number. |
| 2 | Date | Required. Should be in the format mm/dd/yy or mm/dd/yyyy. |
| 3 | Start time | Required. Should include hour, minute, and am/pm. For example, 3:55 PM. |
| 4 | End time | Required. |
| 5 | Location | Optional. (One character) This field is needed to different between separate events taking place on the same sheet of ice at the same time. For example, you might have Tots groups on different halves of your rink (the North half and the South half). In this example, Use "N" for North and "S" for South. |
| 6 | Type |
Required. This field identifies what is taking place.
For an event (or event-group) this should be the name (type) of the event, such as
Freeskate or Compulsory Moves. For a practice-ice session, this should be the
name of the practice-ice, such as "General PI" or "Freeskate", plus the type of
session ("Practice Ice" or "Warmup").
So, this field should look like General PI Practice Ice or Freeskate Warmup. |
| 7 | Level | Required for events and practice sessions. This field identifies the level of the session, such as "Pre-Preliminary". For practice sessions, it identifies the level of practice, such as "Low" or "High" if the session type in Field #6 is divided into levels called Low and High. |
| 8 | Dance | Required for dance events. For example, Swing Dance or Cha Cha. It must exactly match the name of a dance attached to the level specified in Field #7. |
| 9 | Group | Optional. (only valid for events). This identifies the name of the group, for events being divided into multiple groups. Maximum of seven character; many competitions use a single capital letter to distinguish groups, such as A through D. |
| 10 | Designator | Optional. (only valid for events). This can be Men, Ladies, Boys, Girls, or Mixed. This field can be left blank. |
| 11 | Rink | Required. This field identifies the rink where the event or practice session is to take place. It is required even if you only have one rink. |
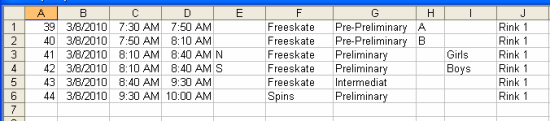
If you have downloaded the system-provided template, you have a good head start. Here is an example of how we might go about uploading the schedule for some of these events. We'll start with a first draft in a spreadsheet program -- in this example we'll assume that we did not start by downloading a template. Here, we'll be trying to input six event groups:
The first thing we must do is save the data in CSV format. To do that in Microsoft Excel, click File->Save As, which brings up the file save menu:

As shown in the picture, be sure to select CSV format in the drop-down selector. After you click OK, you may see this message:

If you see this message, click "Yes".
Now, there will be a text file on your hard drive. If you were to open it in a text-editing program, such as Notepad, it would look like this:

Now that you have a first draft of a CSV schedule file, it's time to try an upload and find out if there are any errors you need to correct. The upload itself is a 2-step process -- the data is not made permanent until after you have the chance to correct problems and fine-tune it.
Back in your "Manage Unscheduled" panel, click the "Upload Schedule File" link, browse to the CSV file you just saved, and submit.
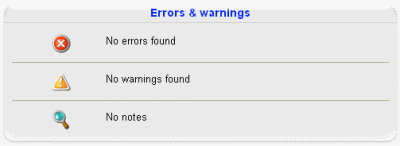
The system will analyze your CSV file and present you with a report -- in this case, the report looks like this:
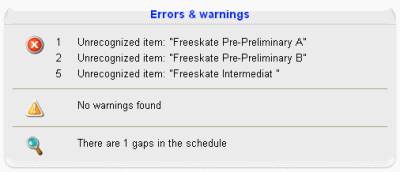

The uploaded items have not yet been committed to the system. The report is a "staging" area, allowing you see how well you've prepared the file.
In the top picture, the report lists three errors along with a description. The number on the left-hand side of each error line is the record number, or row number, of the error.
The third error (row #5) is due to a misspelled event level. However, the first two errors are much more subtle. Nothing is misspelled (even though the file specifies Freeskate while your competition configuration specifies Free Skate. The system considers both spellings interchangeable. All other events must be spelled exactly right).
A closer look at the spreadsheet file shows a missing column. Refer to the table above for the column definitions -- 11 are required, and our example file contains 10. The column being used for Groups A and B is actually the "Dance" column, so the analysis software was unable to find Dance A under Preliminary.
So, we'll fix the spreadsheet by inserting a blank column where the system expects to see the Dance field:

Then, save the file in CSV format, the same way as before. Here's the new file in Notepad:

Now, we'll retry the upload process:
Remember, the analyzer takes your input data very literally. If you are getting errors that appear to make no sense, check to be sure you have the columns in the right order and that events are spelled correctly.
The analysis may alert you to gaps and possible overlaps in your schedule data. These are not always errors. For example, if you have two events on two halves of the ice at the same time, the analyzer may flag this as a possible overlap. Overlaps can be easily fixed later, using features on the scheduling screens (see below).
Gaps can be due to a missing "Ice Resurface" entry, or because of an event that the analyzer discarded because it was unrecognized. A gap should not be of great concern, because it can be corrected just as easily as an overlap.
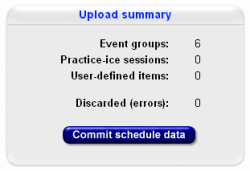
Since we have no errors, we can finalize the upload by clicking the "Commit schedule data" button. Now, when we visit the schedule, we see the following:


The system will accept multiple uploaded files. If you have a large competition with many events, try dividing your upload into separate files to make the data more manageable.
The most common use of this is to upload practice-ice sessions using a separate file.


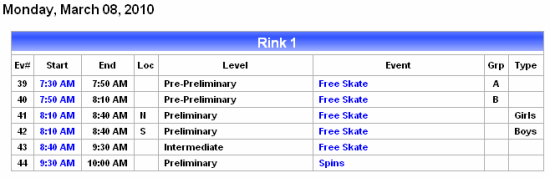
Looking at the portion of the schedule we just uploaded, we can see that the two Free Skate events, Pre-Preliminary and Preliminary, have been scheduled into separate groups. However, groups A and B in Free Skate, Pre-Preliminary have not been filled in with appropriate skaters, and neither have Girls and Boys in Free Skate, Preliminary. These group assignments must be done manually.
There's no need to worry about forgetting to assign groups; the system reminds you and even guides you to the groups that still require assignments. To see this, visit your master schedule screen (the first screen you see when you select Competition schedule from the Schedule menu on your administrator home-page.
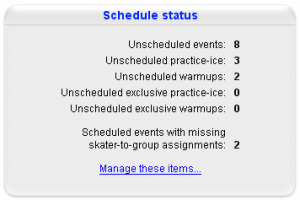
At the bottom of the panel, the indication is there are indeed two events that still need skater assigments. Click the "manage these items" link, and the next page shows the following panel:

These are the two events for which we just uploaded schedule information and still require skater assignments (the following section shows how to make these assignments).
The list of events shown in the panel pictured above include only events that have been scheduled. Naturally, the system has no way of knowing whether there will be multiple groups for events that have not yet been scheduled. So, the list could grow in size as you continue to add items to the schedule.
As mentioned earlier, all custom events (like "Ice Resurface" or "Opening Ceremony") appear on an amber background.
Proof-read your schedule and make sure there are not any events or practice sessions shown with an amber background. This is very important -- the practice-ice selection process will not work correctly unless all practice sessions are seen as such by the system -- the blue background in the indicator of a properly scheduled practice session.
All events appear on a white background.
Only "white" and "blue" items appear in the personalized schedules for skaters and coaches.
This method of entering your schedule is time consuming and not recommended for doing the actual entry of your schedule. The drag and drop screen is much faster; it requires less typing and clicking. This option is better suited for making changes to an already-published schedule, especially when gaps and overlaps creep into your schedule as a result of other adjustments.
The master schedule is accessed by rink. If you have only one rink, the master schedule displays on your "home" schedule screen; if you have more than one rink, each rink is a clickable link to a page that displays the schedule for that rink.
Once you begin scheduling items, the schedule will begin to take shape in the form of a color-coded table. Here is a sample section:
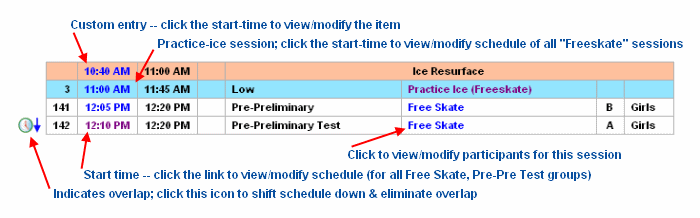
Notice the "clock-with-arrow" icon along the left edge. This icon shows where you may have overlaps or gaps in the schedule. A down-arrow indicates a possible overlap, while an up-arrow indicates a gap.
Assigning skaters to event-groupsAny events that have been divided into more than one group will require you to assign skaters to the appropriate groups. Until you make all these assignments, these events will appear in the "Missing assignments" pane. Here's an example -- "Free Skate, Pre-Preliminary" -- which was scheduled for two groups during the "bulk upload" process:
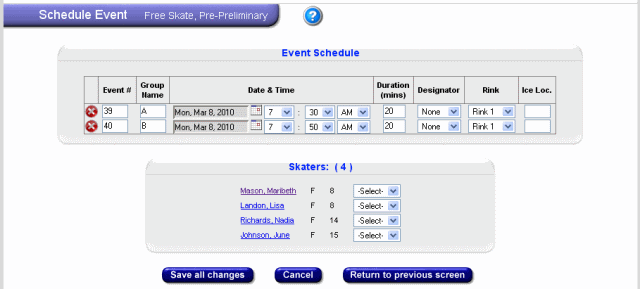
There are six skaters, who are to be split into the two groups. Note that the screen displays the skaters in order by age, to assist you in determining the proper assignments.
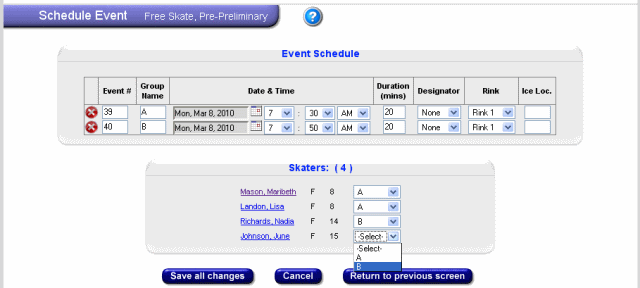
Use the drop-down box to select the proper group for each skater, then click the "Save all changes" button:
Now that all skaters in "Free Skate, Pre-Preliminary" have been assigned to groups, the event will disappear from the "missing assignments" list, and you're that much closer to completing the schedule!
If this event were not intended to be divided into two groups, it would have appeared like this:
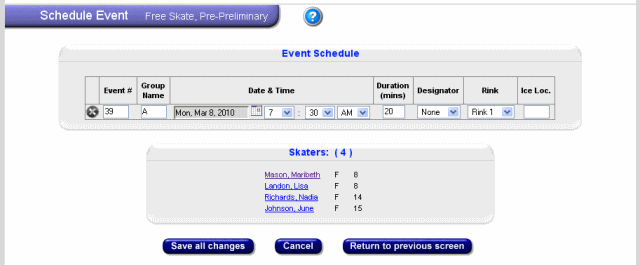
Notice that the drop-down boxes next to each skater disappear when there is only one group. There is no need to assign skaters in this case; this event will not appear in the "missing assignments" list.
Custom events are items in the schedule that are not associated with skaters. For example: "Ice Resurface", "National Anthem", "Lunch Break".
In the drag-n-drop screen, look for this icon near the upper right corner:

Click the icon, and a new "blank" item will appear at the very bottom of the schedule page. Edit the description of the event, and then schedule it the same way that you would any other event.
Custom events are sometimes used as place-holders for skater-based events. For example, "Juvenile Girls Final Round". This event cannot be assigned skaters at the time of scheduling because the initial rounds have not taken place.
We recommend using the "Scheduling & Management" screen (under the Admin Home's Practice Ice menu) to schedule your practice-ice. In fact, practice-ice scheduling has been removed from the drag-n-drop screen, partly because the drag-n-drop screen is not available to the "Practice Ice Chair" role in EntryEeze.
This scheduling screen contains an instructions document to assist you. Basically, this page allows your practice-ice chair to schedule sessions easily, with some additional assistance to make it fast and easy to create large numbers of sessions.
Later, after your skaters begin selecting and/or purchasing sessions, this page can be used to monitor progress. Also, the Practice Ice Chair can make modifications as needed, such as increasing the max # of skaters allowed on a given session, or adding custom eligibility as needed.
To resolve a schedule gap or overlap, use the "keyboard" based scheduling screens (the screens are mostly deprecated, but they are still useful in fixing gaps and overlaps). In the Schedule Management screen, click the "Keyboard" icon (instead of the drag-n-drop icon) and then click the "Current Schedule" option.
You'll find a screen that may look similar to this:
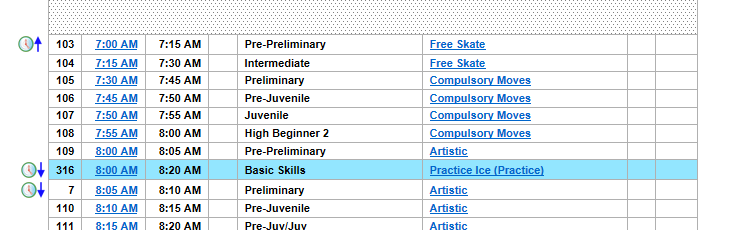
In the example, event 103 appears below a "dead" space in the schedule, above which is event 102 (not shown). The icon next to 103 shows an up-arrow: click the icon and EntryEeze will close the gap by moving ALL items up (beginning with 103). Only items for THAT rink on THAT day will be moved.
Similarly, event 7 is overlapped with the practice-ice session above it. Click the down-arrow clock icon to eliminate the overlap, which will affect all items appearing after it as well.
NOTE: Not all gaps and overlaps should be altered. A gap could represent intended "dead" time in your schedule, and an apparent overlap could actually be that you have half-ice events, which EntryEeze may view as overlaps
If you use more than one rink, you may have noticed that conflicts are difficult to avoid -- and inconvenient to resolve during your competition.
The "conflict analysis" feature allows you search your entire competition for double-booked skaters, and gives you a detailed report in seconds.
Begin by selecting "Conflict Analysis" under the "Schedule" menu. You'll be asked for the "number of minutes" of maximum separation preferred between events. For example, if you enter 20, the report will show you which skaters are scheduled at separate rinks in events that end/begin within 20 minutes of each other.
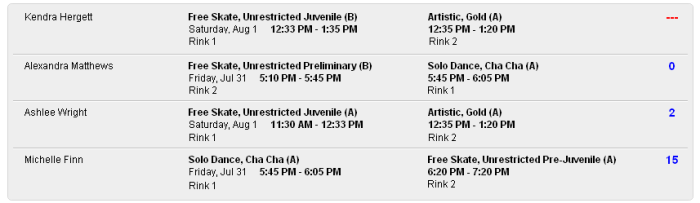
In the example, Kendra Hergett is scheduled in two events that overlap each other; this is a clear conflict. Michelle Finn's Solo Dance event concludes 15 minutes before her Free Skate event begins. This may or may not be of concern, based on factors such as driving distance between the two rinks (if any), whether the skater must change costumes between the two events, etc. Of course, the time separation may change if either rink runs ahead of or behind schedule on that day.
The conflict analysis does not consider practice-ice sessions. It is assumed that your skaters will choose practice-ice sessions that fit within their event schedules.
Some of your events may be divided into different groups (flights). For example, Juvenile Girls may have groups A, B, and C. You must assign the skaters to their respective groups.
In the drag-n-drop screen, look for these icons on the right edge of the page:

|
Group assignments are INCOMPLETE |

|
Groups have been assigned |
Simply click the icon to assign your groups. A dialog-box will appear & allow you to assign the skaters for all of that event's groups. Once complete and saved, the icons for all affected groups will turn gray, indicating completeness.
Designate half-ice eventsUse the "Loc" column (circled below) to designate events that share the ice with other events. This field accepts up to 3 characters. Common abbreviations are "L" or "Lob" for lobby-end, and "Z" or "Zam" for Zamboni-end.

Use the "Ev#" column (circled below) to provide event numbers, which help skaters and coaches navigate schedules during the competition. This field accepts up to 4 characters. Usually, you'll enter something like "23" or "105" -- however, you can also include "a" or "b", for example, if you need "71a" and "71b".

The event numbers not only help skaters and coaches, they help EntryEeze with sorting. In the drag-n-drop screen, when you click this icon:

EntryEeze will use the event numbers when there is ambiguity in sorting. For example, half-ice events are usually scheduled at the same time, so EntryEeze will look to the event numbers to determine display order.
Insert your Zamboni entriesAs you progress toward completing your schedule, you'll have gaps where you plan to resurface the rink. EntryEeze will notate all gaps of between 10 and 20 minutes with an icon (you may have to refresh your drag-n-drop screen to see these):

If the icon appears where there should be an Ice Resurface line item, click the icon to have EntryEeze automatically create a "custom" event for this place in the schedule.
Complete these tasks to publish your schedule:
- Review and update practice-ice eligibility settings
- Check your practice-ice pricing, especially for online and rink sales
- Schedule all events and practice-ice sessions, and assign all groups
- Set your practice-ice "selection" and "purchase" start-dates and deadlines
- Click the "Finalize Schedule" button (in the Schedule Management screen)
The "Finalize Schedule" button will be grayed and disabled if you have any events missing from the schedule, or incomplete group assigments.
When you click "Finalize Schedule", EntryEeze will send notifications to skaters and coaches that the schedule is published and ready for viewing. These notifications will include information about practice-ice selection and purchase (which is why you should complete these settings before publishing).
Clicking this button should, in theory, be the last thing you do before your competition. The publishing of the schedule sets in motion the sequence of events that assists everyone in planning their weekend schedules. Skaters and coaches will be able to view their personalized schedules, skaters will be able to begin scheduling practice-ice, and the general public will be able to see the high-level schedule (without skater information).