
Test Sessions
All test-session features are accessed in the "Test Sessions" menu tab, on your Admin Home page. EntryEeze supports registrations with pricing for members, non-members, and associate members, and various reminders and scheduling capabilities.
Enabling the featureThe first time you visit the "Test Session Management" screen, you'll see a box with information about EntryEeze fees for usage of the feature. Below that, you'll see a button to click:

Enabling the test-session feature
Click the button to enable test-session support for your club. Remember, Stripe processing fees are additional, as with all other features. Consider the Stripe processing fees when modifying your convenience-fee settings (see next section).
Under the Setup menu, you'll find a screen for Convenience Fees. By the time you're ready to enable test-session features, you should already have configured the "base" convenience fee used by your membership site.
As a reminder, convenience fees are charged to each member as an add-on to their other charges. These fees are collected by you, and are designed as a way for you to mitigate the cost of offering online registrations for membership, test-sessions, contract-ice, etc.
On this page, there is a distinct setting for you to specify whether you wish to charge your base convenience fee on test-session registrations. Most clubs use the same setting (Yes vs. No) on test-sessions as for other areas of the site; of course you are free to use the setting that works best for you:

Convenience fee setting for test-sessions
Also under the Setup menu, find the screen for Admin Accounts. It is likely that you will want to create an administrator account for your test chairperson. In fact, EntryEeze has a specific "role" for that person. This means that an administrator possessing only the "Test Chair" role will have full administrative access ONLY to the test-session screens.
Any "Master Admin" also has access to all test-session screens, however in many cases it is unnecessary for your test-chair to have full "Master Admin" privileges.
You may set up a separate Stripe account for test-session funds, but it is not required. A separate Stripe account allows you to route test-session revenue to separate and distinct club bank account. If you do not use a separate Stripe account, EntryEeze will place test-session funds into the same account that you use for all other activities (membership renewals, contract-ice, etc.)
If you would like assistance in setting up a Stripe account for test sessions, please contact us at EntryEeze.
Some clubs have standing agreements with neighboring clubs to allow each other's members to test at the member rate (usually lower than the non-member rate). These reciprocal arrangements can be configured in EntryEeze on the Reciprocity screen.
Skaters from these neighboring clubs will register as non-members. Non-members are always asked for their home-club affiliation during registration on EntryEeze -- any skater whose home-club matches one of the clubs that you configure on this screen will be charged at the member rate for their test registration(s).
In order for this feature to work correctly, each skater must correctly self-report his/her home-club affiliation. It is very rare that mistakes are made, however mistakes ARE possible, so EntryEeze recommends that you monitor non-member registrations to ensure the entries are valid.
For your first test-session, you'll click the "Create" button on the test-session management page, as seen near the top of this picture:
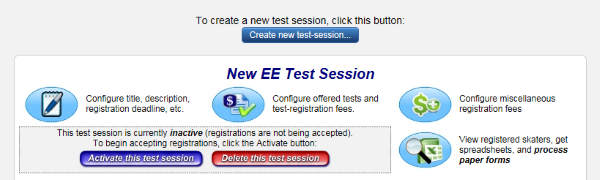
Test session management home screen
The lower part of the above picture depicts a test session that has been created, but not activated. Notice the various icons inside blue ovals, like this one:

These icons are clickable doorways to additional screens where you can manage various aspects of your test-session.
To complete a configuration, click each of the three icons in the top row (see above picture).
EntryEeze will not allow registrations in your test session until you activate it. This prevents activity in the session until after you have completed configuration tasks. To activate, click the blue Activate button, shown in the picture above. EntryEeze will display the following dialog box:
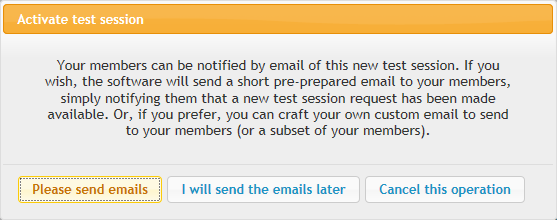
Activating a test session
You have the option of not sending emails, however you will have to find another way to communicate the test session to interested parties. If you use this dialog to send the email notifications, they will only go to your current members. If you wish to publicize the test session to non-members, or neighboring clubs, you must do that separately.
Your (current) members are always allowed to register for your test sessions. Non-members are allowed only if you choose. The primary configuration page for the test-session has a field for "Allow non-members".
Members and Associate membersMembers register simply by logging into their membership account (same as they would to renew membership). A "Test Sessions" tab is available in the member's menu, which brings up a screen that will look similar to this:
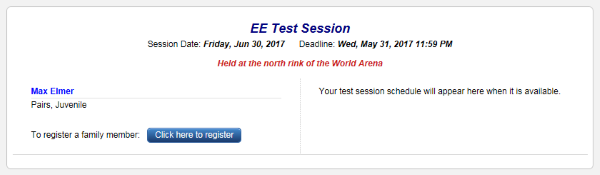
Member registration
The red text is the "description" field that you will fill in during configuration. In the above example, Max has already signed up for a Juvenile Pairs test. If any of Max's family members had also registered, they would also be listed here.
The blue "Register" button takes the member to a registration page. Each member of the family must be registered separately. And yes, a given member can register multiple times, however EntryEeze will disallow duplicate registrations. In this example, Max will receive an error message if he attempts to register for Juvenile Pairs again.
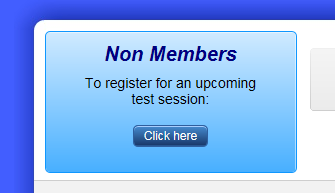
Non-members do not have a membership account, so they must use a different method for registration.
When you activate a test-session that allows non-members, your Welcome page (the public-facing landing page where you and your members login) will show a small panel inviting non-members to register:
Non-member registration
Non-members register is much the same way as members -- a single (not pictured) screen where tests are selected and payment is made. However non-members must complete a few additional fields (home address, phone, email, and home-club affiliation).
Both members and non-members use a "single sheet" signup process -- only one page must be completed for registration. The signup page looks the same for both, with minor differences.
Non-members must complete a few extra fields, such as address & phone number & home-club affiliation. These fields are already known by the software for your members, owing to the fact that they have an account in your membership database.
The signup page asks for the skater's coach(es) -- tracked separately by FS/MITF, Dance, and Pairs. As the skater selects tests, the software keeps a running subtotal lower on the page, including any admin fees that you have configured. At the bottom of the page, the skater must enter credit-card information.
EntryEeze error-checks all fields, and ensures that the page is fully completed before payment can be attempted. After a successful payment, the skater is shown a receipt page which includes all purchased items, and a receipt email is also sent to the skater.
At the bottom of the receipt page, the skater is asked to upload his/her permission form (new in Aug. 2017). A clicked button takes the skater to an upload page, where a Word or PDF file (up to 5 MB in size) can be easily uploaded to the cloud.
In test-session configuration, you can establish a maximum number of test registrations to receive.
The "maximum number" refers to the number of tests (as opposed to the number of skaters). For example, with a 30-test maximum and a current count of 29 tests registered, a skater registering the 30th test would be rebuffed if she attempted to register two separate tests (because that would result in a total of 31 -- too many). However the software would still accept that skater's registration in a single test.
The software uses a behind-the-scenes "reservation" mechanism to make the process transparent to skaters. When the skater clicks a test that she intends to register for, EntryEeze starts a 15-minute timer and sets aside room for that skater. If the skater completes payment before the 15 minutes expires, the registration will be accepted. If the 15-minute timer expires before payment, EntryEeze performs a final check at the time of payment to determine if there is still room for the skater. If there is still room, the registration proceeds without interruption; otherwise, the payment and registration are both rejected and the skater is informed that the session is full. This process ensures that your test session is not over-filled, but also ensures that it is not under-filled due to an "orphaned" registration.
EntryEeze does not tell the skater about the 15-minute timer; it is assumed that the vast majority of skaters will be able to complete the process well within that limitation, and it is not considered desirable to interrupt the registration flow with timer notifications.
EntryEeze now tracks test-session permission forms!
How the process worksSkaters are asked, AFTER payment is completed for a test-session registration, to upload a permission-to-test form. If you are familiar with the music-upload process on the EntryEeze competition-site, it is almost identical.
Permission-form upload is optional for skaters, at this time. There are several reasons for this, most importantly convenience for the end-user. If the skater does not have easy access to the form at the time of registration, the form-upload can be completed at a later time.
The first opportunity to upload the form is on the skater's receipt page, just after test-registration payment is completed. The request to upload is displayed prominently on that page, and a single button-click navigates the user to the upload page, which accepts a single file that must be MS Word (.doc or .docx) or PDF. The maximum file size is 5 Mb.
Once a skater has successfully uploaded a permission form for a given test session, that skater is not allowed to upload a different file for that test session. If the skater returns to the upload screen for that session, EntryEeze informs him/her that the form has already been uploaded. If the skater wishes to change the permission form, he/she must contact you (test chairperson) to remove the form, allowing the skater to upload a new one.
You, the test-chairperson, will see a new button available in the management page for your test session:

New administrative button
The "Permission Forms" page separates test-session entrants by Non-members vs. Associate members.
For each entrant, you may click the  or
or  icon to download and view the form. If it is correct (contains the correct skater name, correct home-club, correct dates, etc), you
can click the "Approve" button, to help you keep track of whose forms you have viewed and accepted.
icon to download and view the form. If it is correct (contains the correct skater name, correct home-club, correct dates, etc), you
can click the "Approve" button, to help you keep track of whose forms you have viewed and accepted.
When you click the download icon, the file will be downloaded with a different file name than the skater used to upload it. This is because EntryEeze renames the file when it is stored in the cloud. This renaming allows EntryEeze staff to more easily sort and manage the large number of files in storage.
Since the form-upload is optional for the skater at the time of registration, you may find some skaters who have not yet uploaded their permission forms. In these cases, you will probably need to click the "Remind" button. This sends an email to the skater, with a gently worded request to upload the form, and includes a link to the upload page. The skater may simply click the link to reach the upload page. The upload page does not require a login.
If you determine that an uploaded form is incorrect for some reason, click the "Remove" button to delete the form. You'll be asked for a reason:
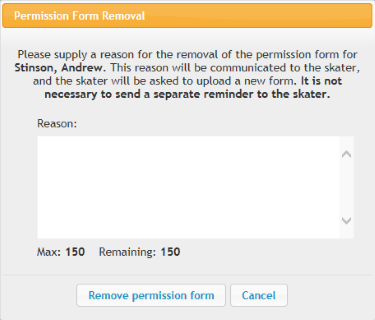
Removing a skater's permission form
The skater will receive an email (including the text of your "reason"), and a request to upload a new form. Using this process, it should be possible to collect correct forms from all skaters.
EntryEeze now allows music uploads for test sessions!
How it worksMusic uploads are handled in a manner VERY similar to music uploads on our competition site, and also similar to the way we handle permission form uploads for test sessions.
After registering for a test-session, the skater is prompted to provide music for his/her test(s) -- assuming that music is required for the test(s). You can download all music files after all test registrations have been received.
Coaches may also upload music for their skaters. This coach-upload feature has been added for "global" coaches in the same screen they've always used to upload music for competitions.
Enabling music uploads for your test session is not mandatory; you can choose whether to enable it, independently for each of your test sessions.
In the page for configuring title, description, deadline, etc. of your test session, you will find these two new fields:

Configuring music uploads
After enabling music for your test session, two new links will appear in the status screen for that test session:
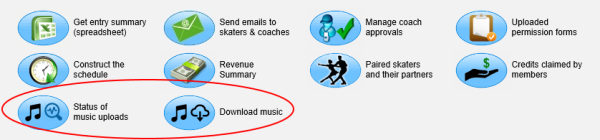
Links to music management
The upload status screen lets you view and manage the music for your test session. A toggle button at the top is designed to let you switch between viewing only music needed entries versus all entries:
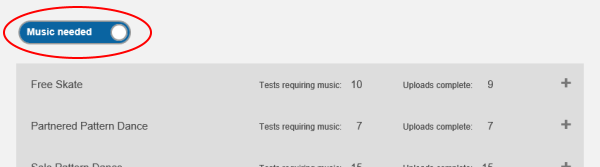
Music status page
In most cases, you'll want to use the default "music needed" setting, because you'll primarily want to upload music on behalf of skaters or send them reminders to do so.
When viewing skaters, a "tools" menu provides access to abilities such as deleting or downloading music, sending reminders, etc. Initially, the "tools" icon is invisible:
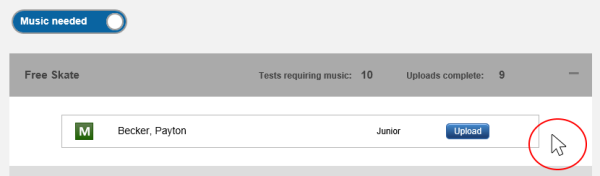
Viewing a skater's entry
To see the "tools" icon, move the mouse inside the skater-entry rectangle:
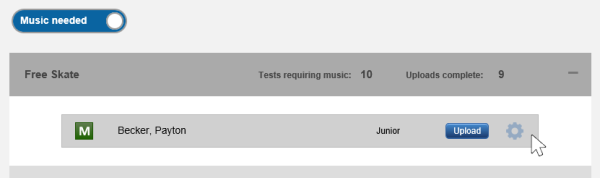
The "tools" icon
Activate the "tools" choices by clicking the icon:
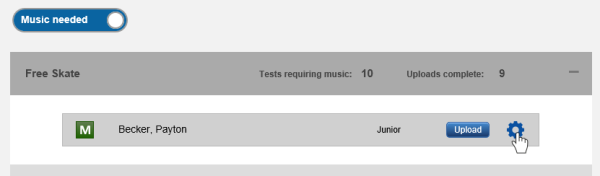
Accessing tools
If the skater's music has NOT been uploaded, the Tools dialog allows you to send a reminder email to the skater. If the music HAS been uploaded, the dialog allows you to download that music file or delete it (should you need to upload a new one). Skaters can delete their own music if needed (before the music-upload deadline), so you should only need this option if a music-change has been made and the deadline has expired.
When you are ready to download ALL music for your test-session (preferrably after all music has been uploaded by skaters and the music deadline has passed), simply click "Download music" (in the status page, see picture above). The music will be compressed into a ZIP file and downloaded. Each music file will be named according to skater name and test type and test level, allowing you to sort and organize your files for playback.