
Music Management
The EntryEeze Music Management feature is a great way to add convenience to your competition's music process. By allowing your skaters to upload their music on the web, many difficulties associated with CDs can be avoided. The hassles of collecting, organizing, and returning physical media can all be eliminated
Additionally, skaters' primary coaches can upload music on behalf of their skaters via their Global Coach Account. And, skaters and coaches can playback a music file any time after uploading, to verify correctness.
The Music Management feature is optional and free to use; if your competition has opted to enable this feature, there are four screens for your Master Admin and/or Music Chair to use.
Summary of UploadsThis screen allows you to keep tabs on how many total files are required to be uploaded for music events, with statistics for how many have been completed vs incomplete.
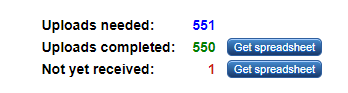
Top of "Upload Summary" screen
The downloadable spreadsheets contain one row per music-file-needed, showing the skater's name and the applicable music event.
Sending reminder emailsWhen you click the "Send Reminders", you'll be taken to the "send email" page, which will be pre-populated with generic text to remind skaters to upload their music. Complete the fields listed below and click "Send" to complete the reminder process:
- Provide a Subject line -- use wording that will pique the interest of the receiver in order to get them to open the email.
- Customize the email body -- if you would like to change or enhance the email content, edit the text. Be aware that there is generally a 30-minute timout on your login.
- Attach a file (optional) -- for example, you could use this to provide instructions on how to convert a CD to an MP3 file correctly
- Select the recipients -- you can choose ONLY the skaters or you can choose the skaters AND their coaches.
- QUICK TIP -- If you manage music often for competitions, you may want to create several text files containing email content that you typically send at various points during competitions. This allows you to quickly cut/paste the needed content each time you need to send music reminders.
Expland the "Completed Uploads" panel to see all of your music events, showing how many skaters have registered vs how many have completed their music uploads.
This panel is intended mostly for informational purposes -- skaters who have NOT completed their uploads can be managed in the "Missing Uploads" panel.
Expand this panel to work with skaters who have not yet uploaded music. This information is listed one row per music-file-needed.
The far-right column of this table contains an "Upload" button. This allows you (Music Chair) to upload the skater's music if needed. This may be necessary if the skater has provided music after the upload deadline, or perhaps the skater is having some difficulty uploading her own music. Clicking the "Upload" button will take you directly to the skater's account, where you can upload music using the same screen that the skater would use. NOTE: by virtue of your admin-credentials as Music Chair, you will be exempt from the normal music-upload deadline.
The purpose of this screen is to provide linkage between your competition events and the appropriate "tagging category". This is important if you plan to use iTunes and Smart Playlists for playing your music – if you are not planning to use this option, you may skip to the next section. NOTE: if you DO use the tagging feature, the software will take the additional step of validating each music file, to identify any files that are not taggable MP3's.
To set the Tag configuration, simply select the tag-category from the drop-down next to each event, to establish which set of tags will be used for the levels of that event
Music Tag Categories are as follows:
| Tag Category | Usage |
| Free Skate | Skaters skating only free skate |
| Short Program | Skaters skating only short program |
| Free Skate Combined | Skaters skating both short and free |
| Program | Compete USA program events with music |
| Light Entertainment | |
| Dramatic Entertainment | |
| Duets | |
| Step Sequences | |
| Pairs Free Skate | Pairs skating only free skate |
| Pairs Short Program | Pairs skating only short program |
| Pairs Combined | Pairs skating both short and free |
| Open Pairs | Special level if offered |
| Solo Pattern Dance | When skater’s choice music is allowed |
| Solo Combined Dance | Skater skating pattern or short and free |
| Shadow Pattern Dance | When skater’s choice music is allowed |
| Solo Free Dance | |
| Rhythm Dance | Couples skating only rhythm dance |
| Couples Pattern Dance Only | Couples skating only pattern dance |
| Combined Dance FD/RD | Couples skating pattern or short and free |
| Special Olympics | |
| Therapeutic Skating |
Tag/Download all music
Use this screen to download all of your competition's music files, even if you do not wish them tagged.
This screen is available to use for downloading music after your entry deadline expires. If you wish to have the music tagged, you must first publish your competition schedule. This is because the tagging process utilizes event groupings and event numbers to populate the tags in each file.
The tag/download process takes place in stages. First, complete the two fields and click "Begin download". This does NOT actually download the files to your computer; it initiates a download of your music files from the cloud to the EntryEeze server. Once received, the files are tagged (if requested by you) and then ZIPped (compressed and organized into one or more downloadable archives). Finally, the ZIPped music archives are offered to you for downloading to your computer.
Use the Maximum size of each ZIP file field to control the size of each ZIP file (100 MB, 250 MB, 500 MB, or 1 GB). The only difference is the amount of time it takes to download the ZIP files from the server; the larger the file, the longer it takes. If you have moderate-to-high-speed internet, we strongly recommend the largest setting; this minimizes the number of ZIP files you'll have to work with.
After the initial download process completes, you'll see the results in the panel to the right:
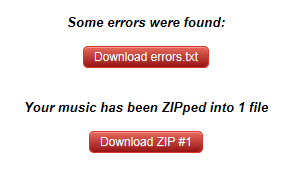
Music download results
During the initial download process, any errors encountered will be reported in the errors.txt file. Most errors are the result of difficulties in tagging files. Common errors include:
- Unable to process -- The file may not be a valid MP3 file. HELPFUL HINT: This error could occur if the skater or coach modified the file's extension before uploading. For example, if an M4A file's extension were changed to MP3, the file is still valid but EntryEeze will report an error because the extension doesn't match the file type. To troubleshoot this, try loading the file into iTunes. If the extension doesn't match the actual file type, iTunes will likely ignore your attempt to open it. Change the file's extension and try again -- iTunes will open the file if it matches.
- Unable to find tag code for event -- this is due to a custom or combined event-level (for which there are no standard tag definitions) or an incorrectly assigned Tag Category.
- Music file is missing from the cloud -- Occasionally, a file may fail to be properly stored in the cloud. (This can be fixed in the "File View" screen.)
- Cannot find a scheduled group of skaters -- this can happen if you late-add a skater to an event, but fail to assign the skater to one of the scheduled groups. This can also happen with Final Rounds, where skaters cannot be assigned to events or where the qualification to the final round is based upon Short Program results.
The presence of errors does not necessarily mean that your download was unsuccessful. You should read the errors file to determine whether the errors are expected.
Files that could not be tagged because of a custom event-level will still be partially tagged , most notably with the event number. This can still be useful in file organization.
Files are tagged as follows:
| Field Name in iTunes | Data from EntryEeze | Comment |
| Title | Skater or Team name | For singles, this is Firstname-space-Lastname |
| Artist | Event Code | From an internal lookup table, not visible in EE. However, event codes are drawn based on the Tagging Configuration |
| Composers | Event # | From your published schedule. This field is blank if your event numbers are unassigned |
| Grouping | Event Group | From your published schedule. In iTunes, beginning with version 12.5.2, their "Grouping" field was changed to "Group description", and "Grouping" was repurposed to a new tag. EntryEeze populates BOTH fields. |
| Album | Segment | (F=Free, S=Short, P1=Pattern Dance 1, etc) |
Before attempting to download the music to your computer, create a folder on your hard disk that will contain the files. This folder should be empty. For this example, we'll assume a competition named "Spring Fling", and that we have enough room on our C:\ drive to hold all skaters' music. This example also assumes the use of Microsoft Windows.
Next, click the "Download ZIP #1" button. The server will initiate a download of the ZIP file, and you should be able to see in your browser the download progress. When the progress reaches 100%, the download is complete and you'll probably be offered a chance to open the file (in Chrome, the file appears in a bar in the lower part of the browser window).
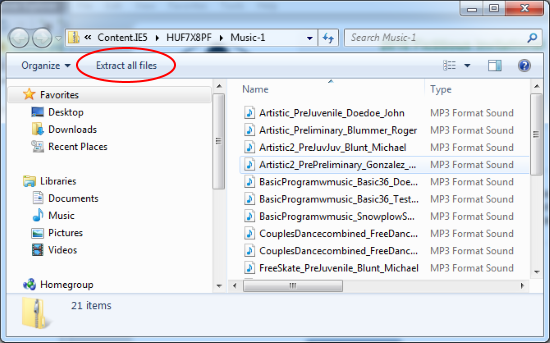
Open the file; you'll see a new dialog similar to this:
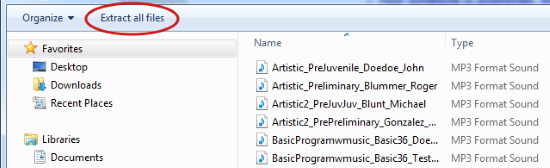
The above window is a display of the contents of the ZIP file. The contents should
consist of all MP3 files; look for an option to extract them (circled in the above
picture). Click "extract all files", and you'll next see a window asking you where the files
should be stored:

Enter the name of the folder you created earlier, then click the "Extract" button. At this point, the MP3 files will be "unZIPped" and stored in your folder.
Repeat this process for all of the ZIP files shown on EntryEeze, each time storing the files in the same folder you used for the first ZIP file. When finished, all your music files will be in that folder, and you can begin working to organize them as you see fit.
Music File View
This screen displays all uploaded music, file by file, sorted by date (most recent upload first).
This screen has three primary purposes:
- It allows you to see the most recent uploads, which is especially useful if you have begun working with your music and want to see the most recent activity.
- If you have already performed a bulk-download of music and you want to pull down the last few files needed to complete your playlists.
- Basic validity-checking is done on each file, to let you know if a music file may be missing from the cloud, which can happen in rare cases.
This screen should not be used for your primary music-download – please use the "Download All Files" screen for that. The intent of this page is to allow you to perform "incremental" downloads – in fact, you may select only a maximum of 10 files to download at one time.
As with the "Download All Files" page, the files you select for downloading will be presented to you as a ZIP file. Simply open the ZIP file and extract the music files, and import to iTunes as you normally would.
Smart Playlists using only event #
You do not have to be a USFS Music Technician to take advantage of iTunes and Smart Playlists. In fact, you don't have to utizile the full tagging features of EntryEeze to benefit from tagging and iTunes.
If you are a music volunteer with little or no experience with iTunes, this section may benefit you.
These instructions are for iTunes on a Windows based machine; the instructions will be similar for MAC machines, but the software may have different names and menu options.
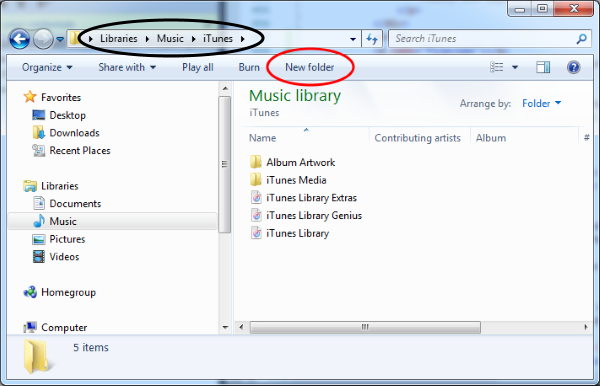
Set up your iTunes music folderGo to your "Music" folder, and find the folder named "iTunes" (if it exists):
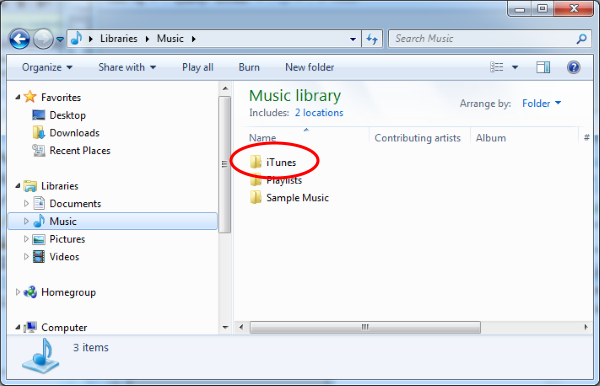
This is the "home" folder for your iTunes application. If this "iTunes" folder does not exist, you can skip the "renaming/delete" step....
- If you are doing this work on your personal computer -- we suggest that you rename your iTunes folder, if it exists. The purpose of renaming the folder is to temporarily set it aside so that your personal music is not cluttered by competition music. Later in these instructions, we'll show you how to restore the folder to its previous state.
- If you are doing this work on your competition's music computer -- we suggest you delete the iTunes folder. This is because it likely contains last year's music, and you'll probably want to start with a clean folder.
At this point, you should not have a folder with the exact name "iTunes" (either because you renamed it, deleted it, or because you didn't have one to begin with). Open iTunes on your computer and it will automatically create a new iTunes folder for you.
Now, double-click the "iTunes" folder that you just created, and again, click "New folder":
Give your new folder a name that corresponds to your competition (for example:)
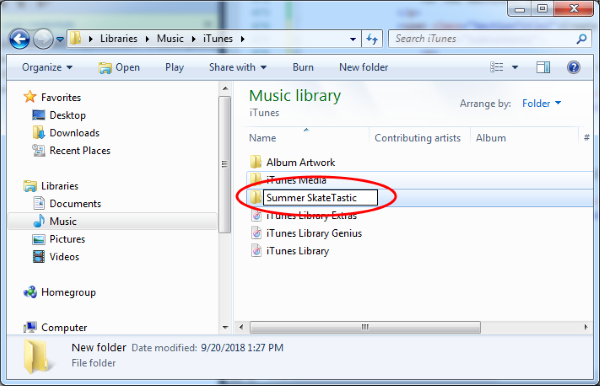
You are now ready to set up iTunes and download your music!
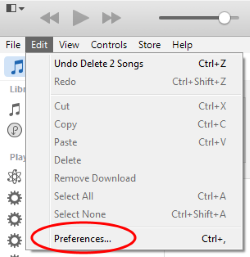
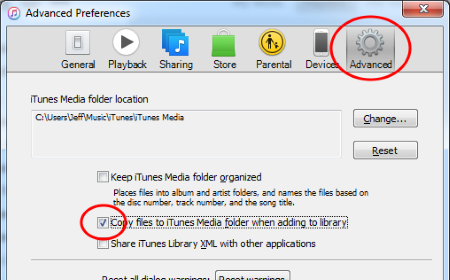
Open the iTunes Settings dialog:
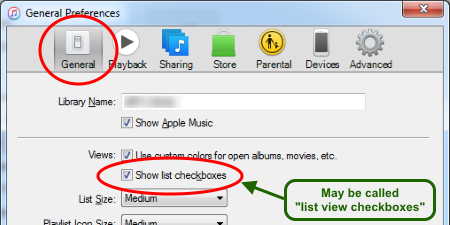
In the "General" tab, check the box labeled "Show list checkboxes":
Click the "Advanced" tab, and check the box labeled "Copy files to iTunes Media Folder when adding to library". This is important for copying your music to additional computers:
Please make sure that your competition chair or referee has entered all event numbers in the schedule, and that no more schedule updates are planned.
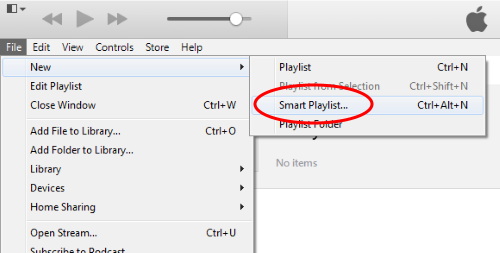
In iTunes, select the "File" menu, and then "New" and select "Smart Playlist"
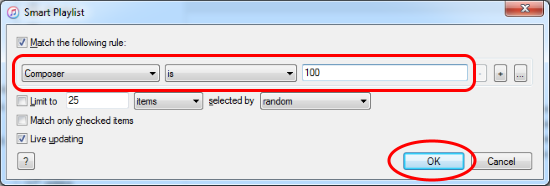
This will bring up a window with some dropdown boxes – choose "Composer", "is", and the event # of an event in your schedule, as shown below; NOTE: you will be creating a Smart Playlist for every unique event # in the schedule. So, start with your first event and work your way through the entire schedule, creating a separate playlist for each. IMPORTANT HELPFUL HINT: You need only create smart playlists for events that require music. It is not necessary to repeat this step for ALL events in the schedule -- exclude those that do not use music, such as Compulsory Moves.
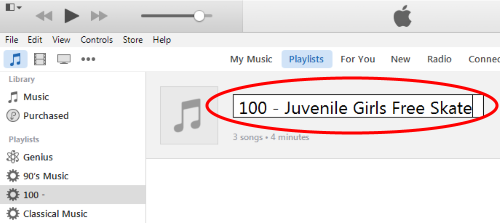
After clicking "OK", you'll see the new playlist appear, as shown below. Edit the name of the playlist by clicking its name (circled in red):
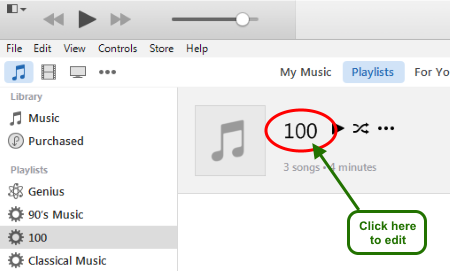
Update the name by adding the event-name, as specified by the schedule or by your referee. We suggest a hyphen, followed by the event name:
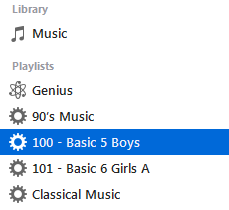
As you work through your events, you'll see the Smart Playlists accumulate along the left-hand side of iTunes:
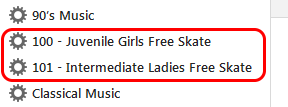
Create ALL of your Smart Playlists before proceeding to the next step. Again, only create Playlists for events that actually use music.
While there are instructions near the top of this page for full configuration of the EntryEeze tagging features, you can disregard most of them if you are tagging only by event number. If you are tagging only by event #, you do not need the "Tagging Configuration" screen.
Find the "Tag & Download All Music" option under the Music menu:
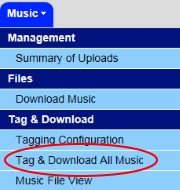
The page will probably look like the picture below; select the two drop-down fields as shown, and then click "Begin Download":

After a few seconds, you'll see the progress bars begin to update, showing that your music files are being retrieved from the cloud. After all three bars are full, the page will update with your results:
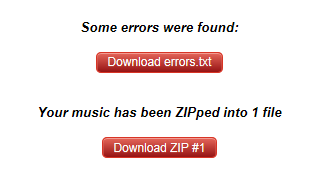
If any errors are found, click the red button to download the errors.txt file and read through the messages. Most errors will likely be due to incomplete tagging configuration; these can mostly be ignored because they apply to the full-featured tagging intended for USFS Music Technicians.
Your music is in the ZIP file(s) that you see available for download. There may be more than one, if you have a large number of events and associated music files. IMPORTANT NOTE: The download process you just completed did not actually download the music to your computer; it downloaded the music from the cloud to the EntryEeze server, where it was "ZIPped" and packaged.
To download the music to your computer, click the red "Download ZIP" button. Your browser will begin downloading -- upon completion, you'll be asked to open the downloaded ZIP file. Do so; you'll then be shown a file window that looks like this:
This window is showing you the contents of the ZIP file -- a list of music files. Click "Extract all files" (circled in red). Next, you'll be asked where you wish to store the files:
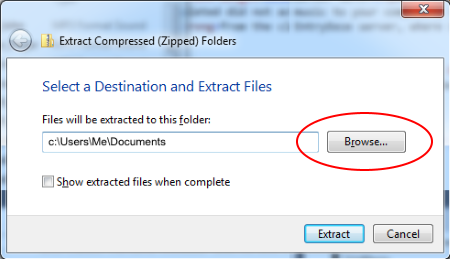
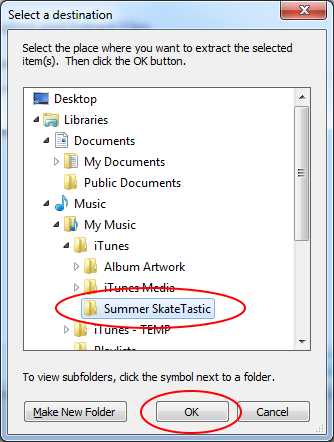
Click "Browse". Remember the competition-specific folder we created under "iTunes" earlier? Navigate to it in this browse window, like the picture below. Select your competition folder and click "OK";
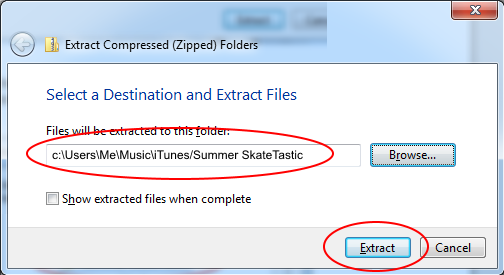
This returns you to the previous window, with your selected destination for your music files in the field. Click "Extract":
HELPFUL HINT: If you had more than one ZIP file, repeat the above process for each ZIP file, extracting the music into this same folder. When you complete the ZIP downloads, ALL of your competition music will be in one place, on your computer.
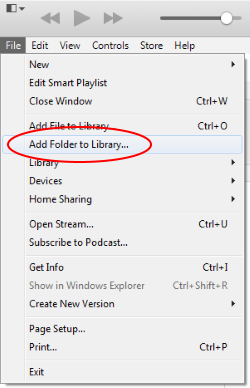
Now you're ready to populate iTunes with your competition music. Open the iTunes application, and click "Add Folder to Library..." under the File menu:
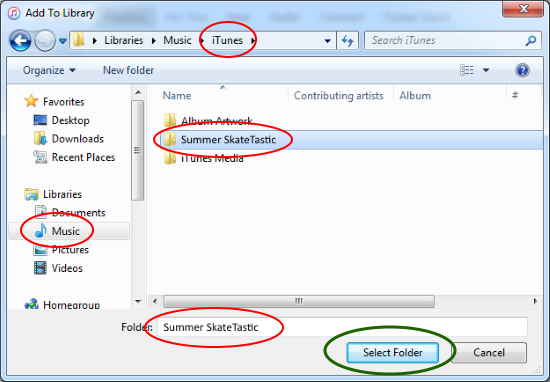
In the "Add to Library" dialog, browse to your music folder, and then click "Select Folder":
At this point, iTunes should have imported your files and automatically filled each of your Smart Playlists with the appropriate music.
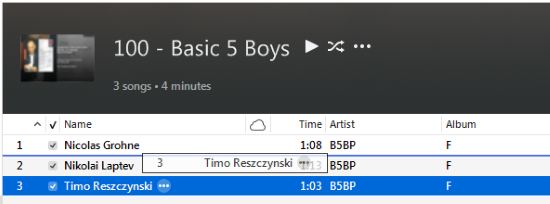
Now that your Smart Playlists are complete, you must put the songs in skating order in each Playlist. You will need the skating orders from your Chief Accountant for this step;
The following steps must be repeated for each event (Smart Playlist) in your iTunes screen...
Select the first Playlist by clicking it in the far left-hand side of the application:
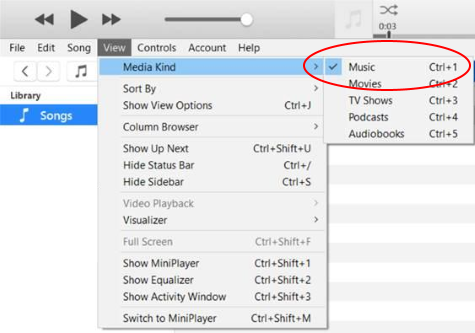
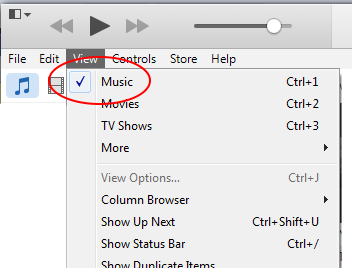
Next, instruct iTunes to display the Playlist as "Music". Depending on the version of iTunes you are using, this may look like one of the following pictures:
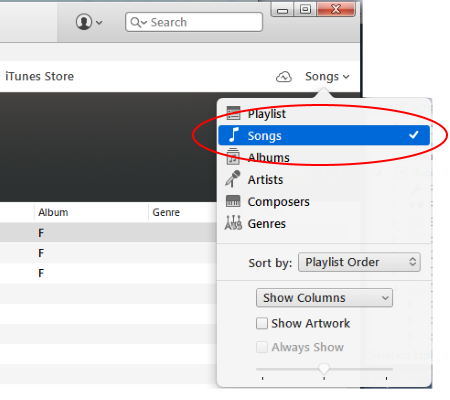
Now, instruct iTunes to display the content as "Songs" instead of "Playlist". This will allow you to modify their order. Again, this depends on your iTunes version:

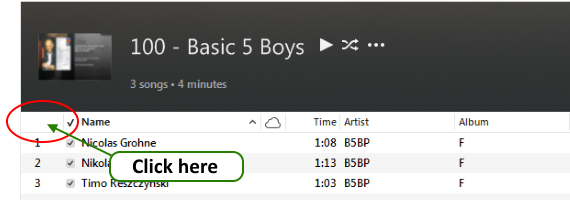
Your Playlist should now be displayed in simple list form in the main iTunes display. Next, click the small box shown in this picture:
This should cause a small arrow to appear in the box:
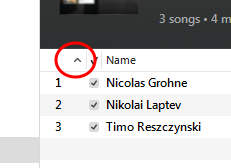
This indicates that you are now able to re-order the music files. To re-order, simply click-and-drag a song, following the blue highlight, and drop the file in the proper place. You may have to drag-and-drop several times to get the Playlist into the same order as that which was provided by your Chief Accountant.
Repeat the above steps for all of your Playlists, carefully following the skating orders provided by your Chief Accountant.
If you have been doing this work on the computer or laptop that will be used at your competition, AND you have only one ice surface, you are finished!
However, if you have been doing this work on your personal computer, and/or you have multiple rinks at your competition, follow these steps to set up your Competition Music Computers:
- Find a portable drive for temporary storage. We suggest a USB stick with enough free space to hold all of the data. 4GB of free space should be enough.
- Copy your iTunes folder from the computer to the USB stick. Simply use Windows Explorer to navigate, as you did at the beginning of these instructions, to the folder that contains iTunes ("Libraries/Music"). Right-click "iTunes", select "Copy", then right-click the destination folder on your USB stick and select "Paste". This will probably take a few minutes, especially if you have a large number of music files.
- Copy your iTunes folder from the USB stick to a Competition Computer. Plug your USB stick into the target computer. After Windows recognizes the stick, perform the same copy process as above, this time copying iTunes TO the Competition Computer's "Libaries/Music" folder. HELPFUL HINT: You may first want to delete the iTunes folder on the target machine, since it likely contains music from the previous year's competition
- Open the iTunes application on the target computer. Verify that your Playlists are shown, and selectable, and contain the proper music. Also, test-play a few songs.
- Rinse & Repeat. Move the USB stick to each Competition Computer, copying iTunes as described above.
- Handling last-minute music submissions. If you follow the above instructions only to discover that a late skater uploaded her music after you finished, you can address this late music on a file-by-file basis. The "Music File View" screen can help (there are detailed instructions nearer the top of this guide page, available here). In a nutshell, download and tag the single file you need and import it into iTunes on each Competition Computer, using a USB stick if necessary. Don't forget: you must still put that skater into the proper place in the music-order, so just follow the previous instructions to re-order the playlist for that skater's event, on each Competition Computer.
- Restore your iTunes folder. If you used a personal computer to build your playlists, you may have earlier renamed your personal iTunes folder per our instructions. If so, and if you are certain your competition music work is completed, close your iTunes application and then navigate to your music library. There, delete the existing "iTunes" folder (which was only for working with competition music), and then rename the folder "iTunes - TEMP" (which was for your personal use) back to "iTunes". The next time you launch the iTunes application, it will appear as if nothing had ever changed.
If you will not be using iTunes, it is not necessary to tag your music. To simply download your music files exactly as they were uploaded by your skaters, go to the "Tag/Download All Music" screen and specify "No, do not tag". Your music will be packaged into ZIP files -- refer to the section Downloading and opening the ZIP files. if you need assistance.
Music files are named in the following format:
EventName_EventLevel(_DanceName)_SkaterLast_SkaterFirst(_PartnerFirst_PartnerLast)
This naming convention can assist you with sorting and organizing the files for playback.
When downloading without tagging, EntryEeze does not attempt to verify file format. Files will be presented to you exactly as they were provided by skaters.
If possible, it may be wise to attempt to play each music file, to ensure that you have a working mp3.